
Recycled Tin Can Flower Pots
- Beth

- May 6, 2020
- 5 min read

I don’t know about you, but I am ready to get outside and start gardening. For me, gardening means nurturing tidy spaces filled with beautiful flowers and perennials. I gave up on growing vegetables more than a few years back. We live in a neighborhood frequented by deer and rabbits, and I fight a battle each summer just to keep them from eating my hostas. Fighting a similar battle with critters over fresh vegetables isn’t how I want to spend my time out in the garden. Besides, I just love beautiful flowers.
We live in Michigan however, and it’s not time to start planting our flowers yet. We have some predicted overnight lows this week that are below freezing. Yikes! I personally like to wait till almost Memorial Day weekend to begin planting to be safe. What to do in the meanwhile?

How about we make some really cute tin can flower pots? Make them now, and they’ll be ready for flowers when it warms up. These pots can be hung en masse on a fence or placed where ever you’d like to add a pop of color outdoors. I found my inspiration and DIY instructions at the I Should Be Mopping the Floor website of Kristi Dominguez. Here’s the link to her site:
One of the things I like best about this project is that it uses empty tin cans, a supply most of us probably have on hand. (Reuse, reduce, recycle!) You could certainly do this project with a clay pot if you had one. But could you easily hang a clay pot on a fence? Not really.

I went to my recycle bin in the garage and found several cans for my project. On her website, Kristi explains that she uses industrial sized cans that a friend, who works at the local school cafeteria, saves for her. I don’t have access to such big cans, so I just chose three random ones from my recycle bin; two were the same size and one a bit bigger for variety.
Remove the labels from your cans and wash them well before getting started. Try to get off as much of the adhesive, left behind from the label, as you can. If you have problems getting the adhesive off try using Goo Gone remover if you have it on hand.
With this project, the catch phrase of Project Runway’s Tim Gunn, “make it work” was a reoccurring theme for me. Working only with supplies I had on hand at home, I improvised or made do. Starting with the paint.


In her post, Kristi Dominguez recommends using chalk-style paint as it adheres well to tin cans without a lot of prep. I would have loved to have used bright colors like Kristi did, but that’s not what I had available. The only paint I could find was red, white, and blue, leftover from a flower pot painting project from last spring. But it was chalk-style paint, and I like being patriotic, so I went with it.
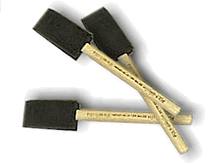
When I do my Maker Magic program at the library, I normally use 1-inch foam paint brushes such as those shown above in the middle picture. I searched high and low at home for a single foam brush and came up empty handed. But I did find two sponge paint daubers, the round foam tools used for making dots when crafting. So, I used the daubers both for painting the cans as well as adding the dots. Make it work! Because I had only two, I had to rinse the daubers out frequently as I changed paint colors.

Let’s start painting. Paint the outside of each can, as well as a couple inches inside the can from the top down. Allow the first coat of paint to dry, and then apply a second coat. Where to set the cans while they’re drying? Put down paper of some sort (newspaper, flyers received in the mail, scrap paper, wax paper, etc.) To keep the painted cans from sticking to the paper, I used toothpicks, forming them into three-legged stars per the picture, to set the cans on. Popsicle sticks would work well also.
After the second coat of paint has dried, it’s time to add the polka dots. I poured the paint into a small paper plate to make getting at the paint easier. Use the circle dauber to dab on the dots in a random pattern.

Once the polka dots have dried, seal the can with a clear, outdoor sealer to protect the paint. I used sealer leftover from last year’s paint project. Unfortunately, I don’t remember what brand of sealer it was, because I poured the sealer into a jar to make working with it easier. Based on what it looks like, I’m guessing I used Mod Podge Waterbase Sealer, Glue and Finish for use Outdoors. I am a big Mod Podge fan. Be sure to seal the bottom of your cans as well to keep them from rusting.
A good pot needs drainage holes to keep your plants from becoming over saturated with water. When the sealer has dried, turn the pot over, and we’ll make the holes. Kristi Dominguez used a drill to make her holes, but I didn’t want to bother with a drill. I grabbed the biggest nail I could find and simply pounded the holes with a hammer. I put three in the smaller cans, four for the bigger can.


If you’d like to hang the pots on your fence, add an extra hole on the side of the can, towards the top. You'll use an "S" hook through that hole to attach it to your fence when it's all planted and ready to go. (See picture above.)
I finished my pots and couldn’t wait to plant something in them. Our local nurseries have opened back up, and I’m very happy for them. Obviously, the next few months are their biggest months of the year. And, they will be open for us to buy our summer flowers, tomato plants, and everything else we want in our gardens. Towards the very end of May, if allowed, I will go wait patiently in line for a chance to buy beautiful flowers. Properly socially distanced, of course. And with my mask on.

But not now. Not yet. It's too early. Then I remembered these cuttings I’ve been nurturing since late last fall on my kitchen window sill. I took them from a green filler plant I bought last summer while visiting in northern Indiana. I didn’t save the plant tag, so I don’t even know what it was. It’s not something I have ever been able to get in Michigan though. Whatever it was, it was beautiful, and lush, and grew like a weed. I loved it and didn’t want to let it go. So, I made about ten cuttings, put them in small, water-filled glass vases and placed them on the window ledge behind my sink. To my delight, they grew roots and lasted all through the winter.

Today I planted three of them into my pots. Fortunately, I had a bag of potting soil in the garage to use. I watered them and now they are sitting on my kitchen table, soaking up the sun. I’m waiting till it warms up and then outside they’ll go. I don’t have a fence to hang them on, so I’ll set them on my patio table. They’ll get full morning sun there, and I’m hopeful they’ll flourish.
If you give it a go and make some tin can flower pots, please take a picture or two and send them to me. I’d love to include your photos in a future post. Send to graib@cidlibrary.org Comments, questions, and critiques are always welcome.

I’m going to close with a little teaser for you. We’ve got something new and exciting coming soon to our library. It’s a database of creativity that offers online video arts and crafts workshops and techniques. So, all you DIY, crafters, and makers out there, get ready to learn new skills or polish up some old ones. I’ll tell you all about it when it’s available. Check back here for details, as well as watch our website for news.
Till next time, stay home and stay safe.


Comments