
Snowy Pine Trees Snow Dome Pillow DIY
- Beth

- Dec 17, 2020
- 10 min read

Are you ready to make some magic this holiday season? I hope so! I’m going to share with you now the craft I hinted at a few posts back. This adorable snowy pine tree snow dome pillow was the project for my December Maker Magic program. Thirty-six kits went out to patrons in the past few weeks. Not going to lie, that was a lot of work. 😊
FYI, there is no Maker Magic program in January. Pre-Covid – back when we did programs in the library – (oh, how I long for those days again) I never scheduled Maker Magics in January because I didn’t want to have to cancel due to snowy weather. I've stuck to my same schedule for 2021 and so, our next Maker Magic program will be in February. If you’re interested in signing up to get a kit, complete with all supplies, registration for the February program begins January 5, 2021, at 10 a.m. You can register yourself online or call the library, and we'll register you. The program fills fast, so don't delay.
I think by now it should be fairly obvious I love crafting with felt, and this cute pillow prominently features beautiful felt in cool, winter colors. If you decide to try this project yourself, I hope you enjoy creating this pillow as much as I did. It might look complicated, but it's really not. Working with felt is both fun and easy to do.


For this craft, two different types of needles were used. Each serves a different purpose and they’re not interchangeable. The chenille needle on the left is for sewing the felt. The eye of the needle is longer, making it easier to thread the the thicker Pearl cotton thread used with felt.
The needle on the right is called a “sharp” and is really a basic sewing needle. It will be used to stitch together the pillow. It is smaller and thinner and will slide through the cotton fabric easier. The eye of the needle is also smaller, but you’ll be using regular sewing thread with it, so threading the needle shouldn't be such an issue.
A little tip before we begin: when you cut your thread to use on any of the steps, please don’t cut too long of a piece. The longer length of thread you use, the more likely it is to get twisted or in a knot. From time to time, if it does get twisted, let go of the needle, hold your work up, and allow the needle to dangle; it will untwist itself using this process.


WHAT YOU'LL NEED
Cotton fabric for pillow, about 1/3 yard (I purchased my blue striped fabric online from a shop called Old South Fabrics, but you can certainly use any material you might have on hand that would look good.)
Felt (I used blue, aqua, white and three shades of green. You can see from the above photo the approximate amounts needed. For scale, the blue piece on the bottom measured 8 x 12 inches. As mentioned previously in a blog post, I buy my felt from an Etsy shop called Felt on the Fly. The owner of the shop is a local Clarkston resident and is great to work with. Wonderful felt!)
Thread for sewing the felt (I used Pearl Cotton, size 8, purchased online from dmc.com. I was able to coordinate my thread colors to the felt colors, but if you bought just white and used it for most everything, I think that would work as well. Except for the tree trunks; you really need brown for tree trunks.)
White pom-pom, ¾ inch
1 Button
Polyester Fiber Fill
All-purpose thread (something that matches your pillow fabric)
1 chenille needle and 1 sharp needle (as discussed above)
Straight pins
Scissors
Ruler and pencil
Note: I did all my shopping online for the materials used in my kits, but most of it, if not all, could be purchased from Jo-Ann, Michaels, Hobby Lobby, etc.
WHAT YOU’LL DO
1.) Download the templates below. Print and cut the templates out.
2.) Using the templates, trace all your felt pieces and then cut them out.
3.) Place all the smaller felt pieces down on the blue background piece. Move them around to get a feeling for where you want to place them and where you’ll be pinning them, each in turn.

4.) Pin the white dome down. Set aside all the other pieces for now.
5.) Using the chenille needle, you'll sew the white dome down using white Pearl cotton thread.
First, thread your needle. For sewing on the felt, we will use the single thread method shown on the bottom. (The double thread method will be used later when we make the pillow.) Tie a knot at the end of the thread.

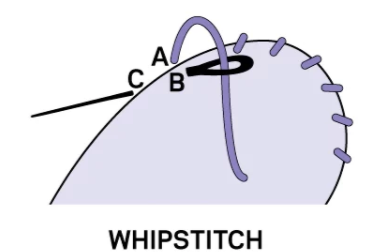
You will use the whipstitch to attach the dome and all the felt pieces. As in the diagram below, bring your needle up at A and then down at B, coming back up at C. The A stitch will be right at the edge of the felt piece you are attaching on the top. Try to keep your stitches neat and straight as shown in the sample to the right.


Continue sewing around the entire dome using the whipstitch, removing the pins as you go. Try to space your stitches evenly apart.
When you get to the bottom corners of the dome, your stitches should be placed as in the photo here. Use the same corner placement for the bottoms of the three trees.

When done sewing around, on the back side, tie a knot and cut the thread about ¼ inch from the felt.
6.) Pin the aqua felt base of the dome, overlapping the bottom of the dome by about ¼ inch. Sew the dome base using the whipstitch per the instructions above.

7.) Before sewing the trees on, place them again on the dome to get a sense where you want them to be. When satisfied with where you have them, pin down the biggest, dark green tree, setting the other two trees aside. Sew on the big tree.
Place, pin, and sew on the middle tree down.
Place, pin, and sew on the last, smallest tree.
8.) To add the tree trunks, first stitch a three-sided box at the base of each tree, using a single straight stitch per side. Hopefully you'll have brown thread for this step. Fill in the trunk using the satin-stitch. To satin-stitch, fill in the trunk area with straight stitches, stitching from edge to edge and placing the stitches side by side.


9.) Using a straight stitch and white thread, create a snowflake on the largest green tree as shown in photo.

10.) Now, what surely will be your favorite part of this project: making French knots for snowflakes. Actually, while I’m being sarcastic about them being your favorite part, do not fear them. 😊
Google “cutesy crafts French knot” and you’ll find a YouTube video that does a great job showing you how to make them; I needed a refresher course myself because I hadn’t made one in years.
And here are written instructions if you’d rather: to make a French knot, bring the needle up at A. Wrap the thread around the needle two or three times without twisting it. Insert the needle into the fabric at B, about 1⁄16" away from A. Gently push the wraps down the needle to meet the fabric and then pull the needle and thread through the fabric slowly and smoothly.
Do yourself a favor and find the YouTube video. I think it’s much easier to understand how to make a French knot watching rather than reading.
Now that you’re a French knot pro, scatter random French knots all over the dome and trees.

11.) Sew on your button. You can tie a knot on the back of the felt to secure the button in place, but don’t cut the thread as you’re going to continue right on with the lazy daisy embellishment stitches on each side.

12.) The lazy daisy stitch should be familiar to you if you made the “Embroider a Garden” project from the July 8 blog post this past summer. It was used on that project to make the leaves on the flowers. Here’s a quick tutorial on how to make the lazy daisy again:
Pull the needle up at A and form a loop of thread on the fabric surface. Holding the loop in place, insert the needle back into the fabric at B, about 1⁄16" away from A. Bring the needle tip out at C and cross it over the trailing thread, keeping the thread as flat as possible. Pull the needle and trailing thread until the loop lies flat against the fabric. Push the needle through to the back at D to secure the loop.
Using the lazy daisy stitch, add the embellishment stitches shown below.

13.) Sew the white pom-pom on at the top of the dome. Make as many stitches as you need until it feels sewn on securely. On the backside of the felt, tie a knot and cut the excess thread.
The applique portion of the project is now done. Time to cut the pillow pieces and then attach the felt applique to one of the pieces.
14.) You need two pillow pieces, each measuring 12 x 10 inches.
Cut both pieces at the same time by folding your fabric over.
Using a ruler and pencil, lightly draw a rectangle measuring 12 x 10 inches in the middle of the fabric.
Pin the fabric together along the inside of the rectangle and then cut it out.
15.) Place the felt applique directly in the middle of one of the pieces of pillow fabric, making sure the "right side" of the fabric is up. Pin it in place.
NOTE: in sewing, the “right side” of the fabric refers to the pretty or printed side.

16.) Again, using white Pearl cotton thread, whipstitch the applique onto the pillowtop. Finish on the backside by knotting the thread and cut the excess thread.
You’re now going to switch over to using the sharp needle and the all-purpose sewing thread. If you have a sewing machine, feel free to sew your pillow together using your machine. It would certainly be quicker. 😊
17.) Take the two pieces of pillow fabric and place one on top the other, right sides together. Pin them together, except for about a three-inch space at the bottom. You won’t be sewing in this area, as this is where you will turn your pillow case, right side out, when done sewing.


18.) You’ll be sewing a ½ inch seam allowance; that is, there will be ½ inch from the edge to your stitching line. To help you know where to sew and to keep your seam straight, lightly draw a line, with a ruler, on each side of the fabric, ½ inch in. Don’t draw the line at the bottom in the area you left unpinned.
19.) Thread your sharp needle using the all-purpose sewing thread. Again, don’t cut your thread too long. Trust me on this. This time, you will use the double thread method. That is, you’ll bring the two ends of thread together and tie them in a knot.
20.) When sewing the pillow case together, start on either side of the space at the bottom and sew all the way around the case, to the other side of the space at the bottom.


You will use the very basic running stitch in this step. Up at A, down at B, up at C, down at D, etc. Try to keep your stitches as small as possible so that your pillow case is sewn securely together. You can load several stitches on the needle at one time to make the job quicker.
When you’ve sewn all the way around to the other side of the space at the bottom, turn and sew all the way back around to where you started. You want to make sure your pillow case is sewn tight, because you don’t want it to split when you stuff it with fiberfill. When you get back to where you started, tie a secure knot and cut the excess thread.
21.) Clip all four corners at an angle as shown here, careful not to cut your stitching. This will help to make sharp corners on your pillow.

22.) Turn your pillow case right side out. Go slowly and carefully, so that you don’t tear your case apart at the opening. Make sure the corner points are fully pushed out, poking your finger into the corners.
23.) I suggest ironing your pillow case at this point. It will make the seams crisp. Also, this will allow you to fold in the unsewn edge and make it sharp, which will help you when you sew it closed in a step or two. In the picture here, there’s a little bit of gap in the seam at the bottom. That’s the unsewn seam, and now its edge is crisply defined.

24.) Stuff your pillow with the fiberfill. Be sure to poke it into each corner the best you can.
25.) All that’s left to do is sew the seam at the bottom closed. To do this, you’ll be using the ladder stitch. There’s a great how-to tutorial on a website called Melly Sews. Check it out.

Here are her written instructions:
1. Hide knot in seam allowance.
2. Take a stitch on one side of the fabric parallel to the edge.
3. Take a stitch on the other side of the fabric, parallel to the edge.
4. Continue across seam, forming a series of stitches that look like a ladder.
5. Pull thread tight to close seam and hide stitches inside.
6. Knot the thread by winding it around the needle a couple times and pulling the knot close to the fabric. Then push the needle through the fabric as if you’re taking one more stitch. Bring the needle out and cut the thread close to the fabric, and pull the tail inside the fabric to bury it.

And that’s it! You have just created a beautiful Christmas pillow that you can proudly display all winter long. Or, give it as a gift to a loved one. 😊
Can I tell you a funny story about when I was making my pillow? File this in the "do as I say, not as I do" category. Because I wasn't really thinking, I sewed my pillow case together before I sewed the felt applique on! Yup. And even though I have a sewing machine, I'd sewn it by hand because it only seemed fair that, if I was telling you to sew it by hand, I should as well. After spending all that time hand-stitching it together, there was no way I was going to rip it apart just so I could sew my felt applique on easily. So, I turned my pillow case right side out and preceded to sew my applique on, keeping one hand on the inside of my pillow case the entire time. It was a challenge, but thankfully I pulled it off. Please don't make this mistake. 😊
As always, email me if you have any questions, comments, or concerns: graib@cidlib.org
If you make one of these beautiful pillows, please send me pictures of your finished craft for use on the library’s Instagram account. I'd love to share you work with other patrons of the library.
With the busy holiday season upon us, I'm not sure exactly when I will post next, so I'm going to wish a Merry Christmas and Happy New Year to you all right now. So many wishes for the new year, but one at the top of of my work list is being able to gather again in the library in 2021, sooner, rather than later. But until that's possible, I will continue to blog right here for you, and we'll have fun together. 😊
Take care and stay safe. ♥

(In case you're wondering, that's a finger heart. Something I saw on Instagram. ♥ )


Comments